About Reflections: Every photo is a frozen memory. BUT every memory is also a reflection. AND every reflection is a distortion of the truth based on perspective. This series explores literal and figurative reflections.
In the first behind the scenes post on this series, you probably noticed there were barely any literal reflections. I let myself create anyway, and relied on the written reflection, which has become such an important part of my work, to squeeze the images into this series. Once I got started with literal reflections, though, it was kind of hard to stop!
Turning Art into Art!
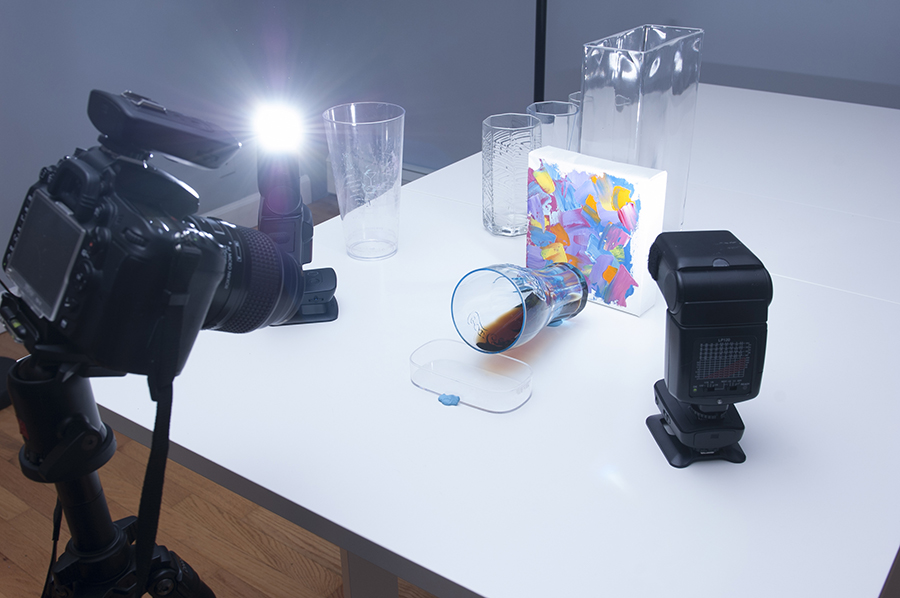
An online course in palette knife painting led me to create the colorful abstract painting pictured below. It was only meant as a practice canvas, but I liked the way it turned out and decided to keep it. I thought it would be interesting to see what kinds of reflections I could make with it.
Inspiration in the Bottom of a Glass
The reflection surface was inspired by wine! As I was sipping on my pinot noir one night, I noticed how much I loved the reflection of the bottom of the glass into the dark smooth liquid. I wouldn’t dare waste wine, though! So I used coffee instead.
I played with my wine glass a little, but the reflections were kind of boring with its smooth sides. I rummaged through my cabinets to find an assortment of randomly shaped glasses that my landlords had left behind. Jackpot!
As you can see in the above photo I was trying to light the canvas… and it was just not working for me. I couldn’t light the canvas without throwing unappealing highlights onto the glass and coffee.

The Solution?
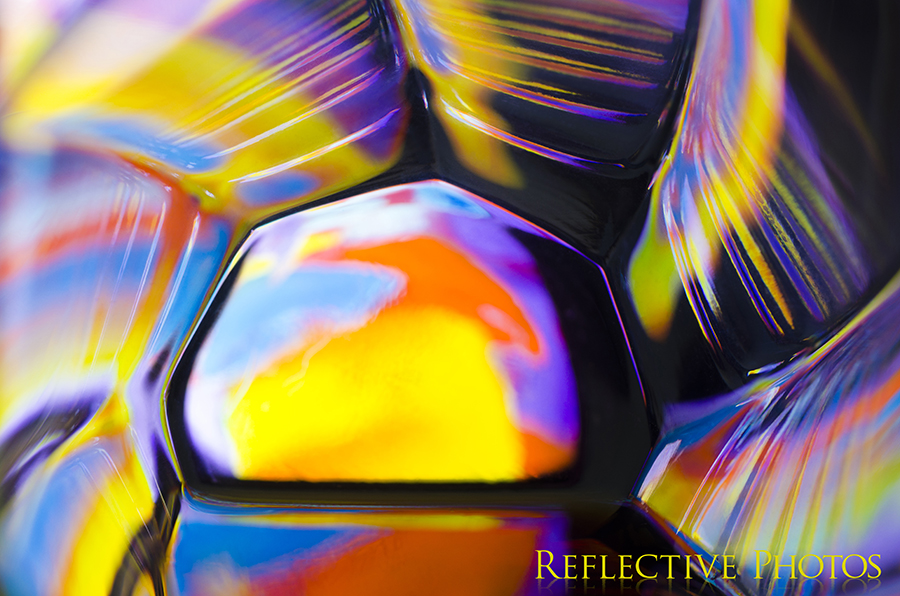
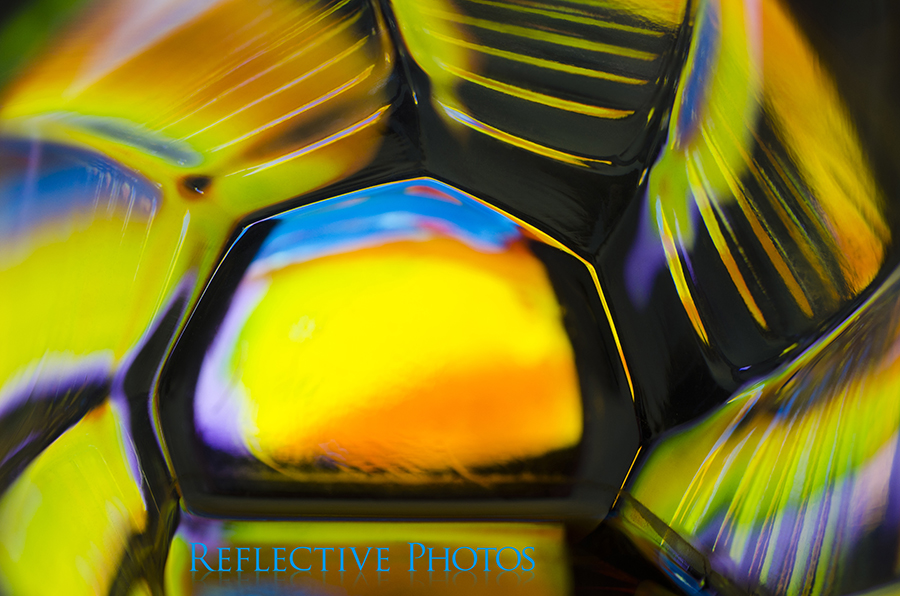
I took close up photos of my canvas with my phone and used the backlighted images of my art to create the reflection. Then I only had to use one flash, bouncing off the ceiling, to brighten up the areas surrounding the coffee puddle.
I loved the resulting photos so much that I made a bunch of variations by rotating my phone and zooming in on my favorite parts of the image. Here are my favorite picks!
Read my reflections in “A Toast to Every Sunrise” – This image is titled “Twisted Sunrise”

Read my reflections in “A Toast to Every Sunrise” – This image is titled “Winter Sunrise”
Read my reflections in “A Toast to Every Sunrise” – This image is titled “Jamaican Sunrise”

Read my reflections in “A Toast to Every Sunrise” – This image is titled “Neon Sunrise”
More Techie Details
The other secret behind this set of photos was that each one of these was actually 5 or 6 images all merged together in a focus stack. Focus stacking is a tedious solution for when you can’t get all your favorite parts of the image in focus. I spent about 2 hours on each of these photos in Photoshop.
The one downfall of using a macro lens (I was using a Nikkor 105mm f/2.8) is that the closer you are to your subject the less you are able to get in focus. In other words, shooting into a deep glass, my lens might be able to make about an inch of depth sharp, but the rest of the detail will be blurry.
So what happens if you have 5 inches of depth and you want it all in focus? First make sure you’ve pushed the limits of your aperture (for the most depth of field use the highest number f-stop). If you still need more distance covered you can focus stack your images to create more sharpness in Photoshop later.
So, for each complete image, I also had to shoot several images that were focused at various points inside the image. I used manual focus, and after each shot I rotated the focus ring slightly to bring my focus point a tad closer in each consecutive shot. That’s the easy part… I will not even begin to tell you how I merged the resulting photos into one completely sharp image, but maybe I’ll make a video about it one day. Leave a comment if you’re interested in seeing this process at work. =)
One More Tip
If you need a larger screen you could use a tablet, laptop, or even a TV to do the same thing. The possibilities are really endless with this setup. I could spend a lifetime simply using different images on my phone and then swapping out the glass with other reflective surfaces… but I bore too easily to stay in that comfort zone.
Part 3 will reveal the shiny objects I used for the next part of the reflection series. Stay tuned!
